For quite some time I struggled trying to find out the algorithms which, when applied to images, produce results such as sharpening, softening, edge-finding, etc, usually called filters in image-processing jargon. The reader has probably seen such effects included in virtually all commercial image- or photo-processing and retouching software products. How do they do it? For years I used to think that the algorithms are complex. I read books on image processing, and got even more confused (maybe I chose the wrong texts; some authors have a knack at making simple things sound complicated). Finally, I visited a web page which is referenced at the bottom, and understood that the procedures are extremely simple. For the interested reader's benefit, I present what I found by experimentation below, in plain English.
Suppose we are given an image, and we can access each pixel in the natural way, that is, using two coordinates [x, y] (column x, row y). Each pixel is a combination of three colors: Red, Green, and Blue, each color represented by an integer value from 0 to 255. (0 means complete absence of the color, 255 means the color participates with full intensity.)
Now suppose we want to "sharpen" the image. All we need to do is "pass a filter" over every pixel in the image. For example, a sharpening filter could be the following:
| -1 | -1 | -1 |
| -1 | 9 | -1 |
| -1 | -1 | -1 |
To pass this filter over the image means the following: For every pixel [x, y] of the image consider first its red-value component. This will be an integer between 0 and 255, as explained above -- call it R for ease of reference. Now imagine that R is placed at the center of the 3x3 filter shown above, i.e., at the location of number 9. Multiply R by 9. Now do the same for each horizontal, vertical, and diagonal neighbor of pixel [x, y], that is, take the pixel [x-1, y-1] and multiply its red-value component by -1 (because that is the value in the corresponding location in the filter); same for pixels [x, y-1], [x+1, y-1], [x-1, y], and so on. Finally, sum up these nine products. The result is the red-value component of the new ("filtered") pixel. Do the same for the green and blue components, and you have the whole pixel of the new image. If the values are less than zero, make them zero; and if they are over 255, make them 255. Apparently, this procedure can be repeated for every pixel of the original image except the ones at the very edge (first & last row, leftmost & rightmost column); ignore those pixels -- copy them directly from the original image.
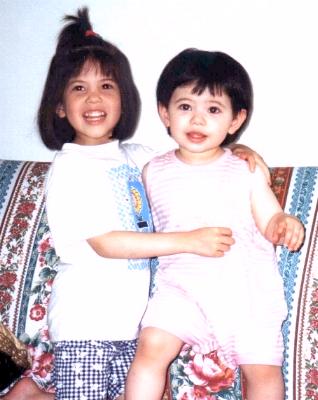
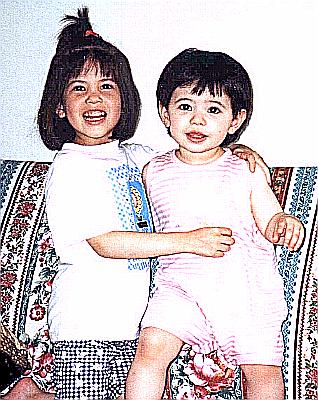
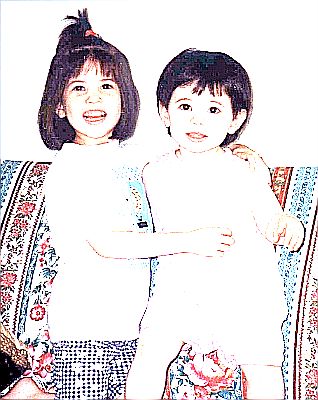
Applying the above sharpening filter on the image shown below on the left, we get the image shown below on the right:
(Notice that if you take this very image on the left, which is a JPEG, and implement the procedure I described, you will get an almost same, but not identical result. This is because the original image I experimented with was in Windows BMP format.)
A minute change in the values of a filter-matrix can have dramatic effects. For example, suppose we change the value 9 at the center of the sharpening filter, into an 8, thus:
| -1 | -1 | -1 |
| -1 | 8 | -1 |
| -1 | -1 | -1 |
We then get the following image on the left (the image on the right is produced by another filter discussed later, and is juxtaposed for comparison).
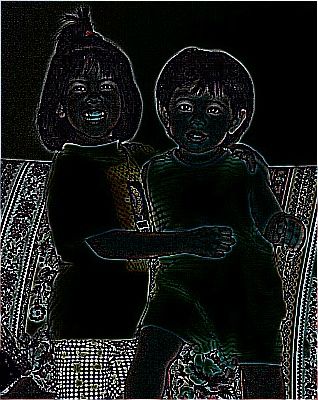
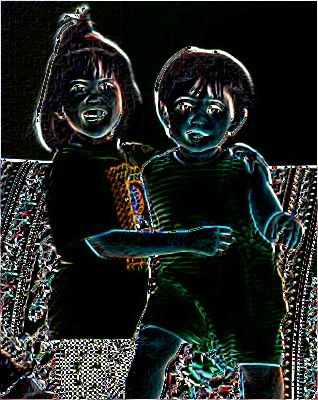
The image on the left could be seen as showing the edges of areas, i.e., border lines where smooth areas meet. The result is not very good, though. (For example, look at the chin-line of the child on the left, which is non-existent.) A different result (not necessarily better), shown with the image on the right, can be achieved by applying a combination of the two filters given below:
| 1 | 2 | 1 |
| 0 | 0 | 0 |
| -1 | -2 | -1 |
| 1 | 0 | -1 |
| 2 | 0 | -2 |
| 1 | 0 | -1 |
Apply the top filter first, and get one new value (for one color), let's say R1. Then apply the second filter on the same pixel, and get another value for the same color, say R2. The final value of the color should be the square root of the sum of the squares of R1 and R2. Repeat for the other two colors to get the full R,G,B triplet for the pixel, and for all pixels on the image. That's it. You'll get the image shown on the right of the pair, above, which could be seen again as showing the edges of areas, except that most edges are thicker, smoother, and in some cases more accurately corresponding to the "true" edges detected by our visual system. Where fine details are necessary, such as in the area around the eyes, the leftmost image seems to do a better job. It is possible that a combination of the two edge-detectors might be even better, although exactly how they should be combined is not very obvious to me.
To whoever visited this page by following the link through my "main" research page, it might seem that experimenting in this area of image processing is totally irrelevant: Bongard problems have black & white images, with shapes which have crisp and clearly delineated edges. Indeed, B.P.-like images would not benefit from such processing, since the procedures I apply in my program are specialized and very efficient, "knowing" that pixels can only be black & white. Image processing of the sort described on this page could be seen as a "front end" to the Mentor Section. Indeed, suppose we take the original image and apply the following filter:
| -1 | -1 | -1 |
| -1 | 10 | -1 |
| -1 | -1 | -1 |
This is similar to the above-mentioned sharpening filter, except that the central value of 10 instead of 9 produces a "sharpen-and-wash-out" effect, as shown below, on the left:
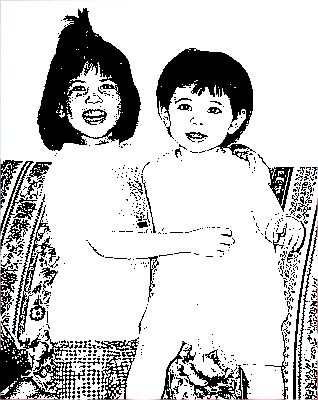
Now, we may take the image on the left and proceed as follows: every pixel which is sufficiently "close" to white color becomes white; and every pixel which is not close to white, becomes black. By "close" we mean that the Euclidean distance of the pixel's color from white is a sufficiently small number. What is the Euclidean distance? Each pixel, as noted above, comes in three color components: [Red,Green,Blue], each an integer between 0 and 255. For example, white is [255,255,255]. This triplet is like the coordinates of a point in 3-D space. So, if we take two such points (i.e., two colors) such as [R1,G1,B1] for point 1, and [R2,G2,B2] for point 2, we can compute their Euclidean distance d from the formula:
![]()
So, [R1,G1,B1] can be the given pixel on the image, and [R2,G2,B2] can be the white color, i.e., [255,255,255]. We compute d from the formula above for each pixel, and if d is less than 30 (an arbitrary threshold), we turn the pixel to white; if d is more than 30 we turn the pixel black. Applying this procedure[1] on every pixel we get the image shown on the right, above, as a result, which is exactly suitable as input to the Mentor. The latter, as is currently implemented, can identify the curved lines that constitute the main parts of the above image (although it is still far from being able to learn patterns of faces, and recall them from memory). This is roughly part of my counter-argument against the criticism according to which Bongard-style image processing is useless, because it pertains to unrealistic images of black & white objects.
Footnotes:
1. One can experiment with various values for threshold, and get different results, which usually give a tradeoff between how sharply the edges are shown in the resulting B&W image, and how much noise is included.
The original motivation for attempting the programming exercises described in this page was provided to the author by this excellent web-page, which is part of the documentation of the Image/J image processing system.